
Printing on Different Types of Paper and Media
Your HP DeskJet printer is designed to encompass so many different types of print
media that you’re practically set up as a small print shop. This chapter explains
how to use the different printing materials in tables that span both pages.
10
Beyond the Basics
2
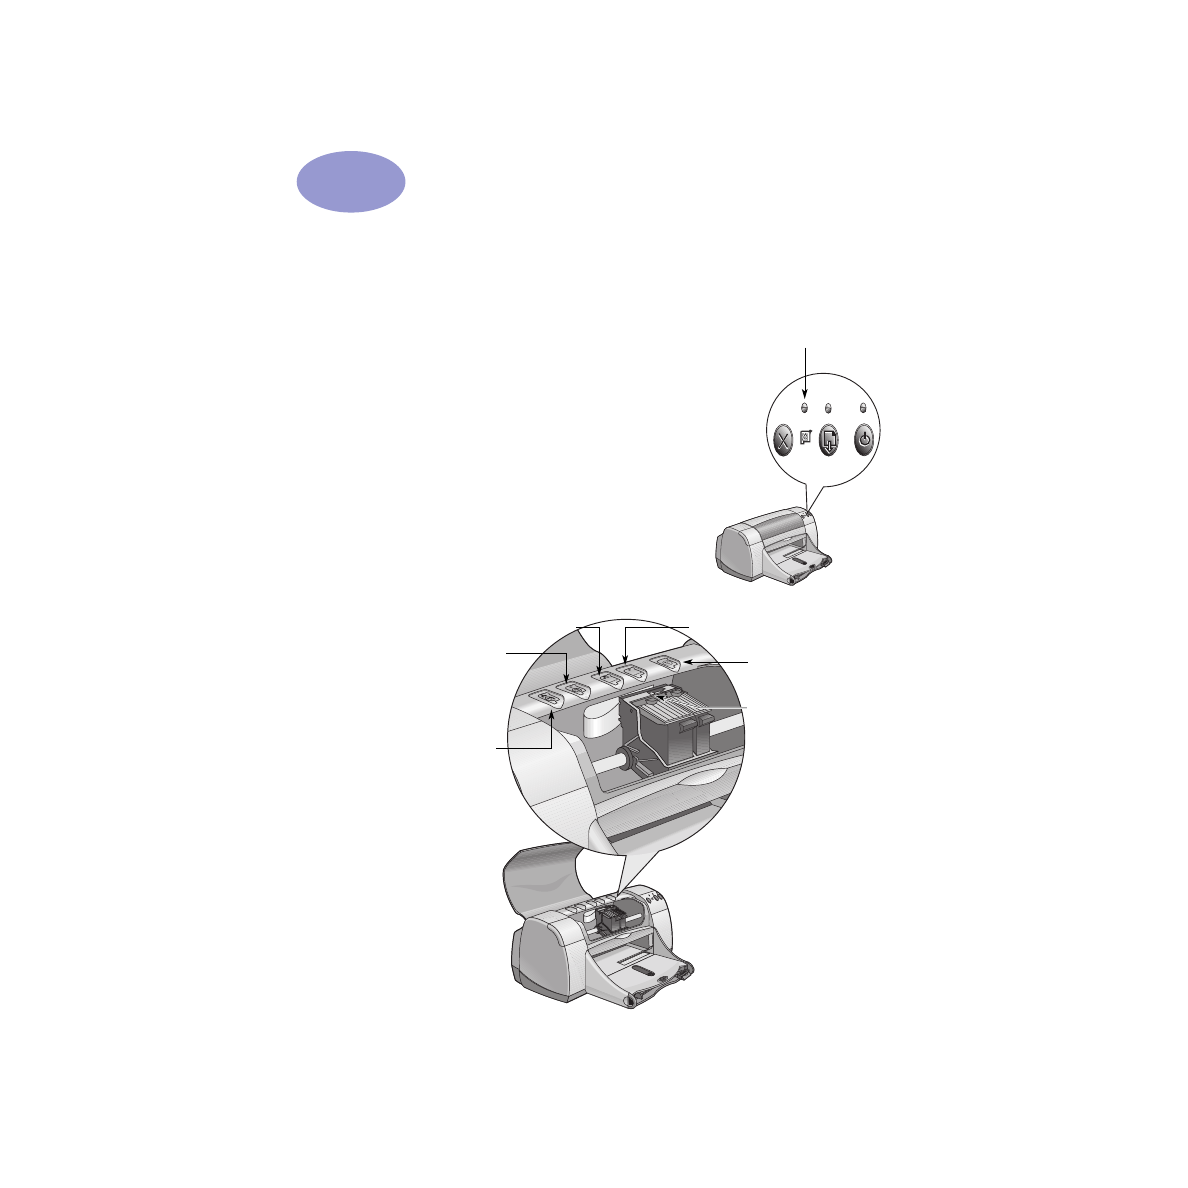
OUT tray down
Paper width guide
Photo Tray
IN tray pulled out
OUT tray up
Photo Tray Button
Single envelope slot
Paper length guide
IN tray pushed in
I want to print…
I should…
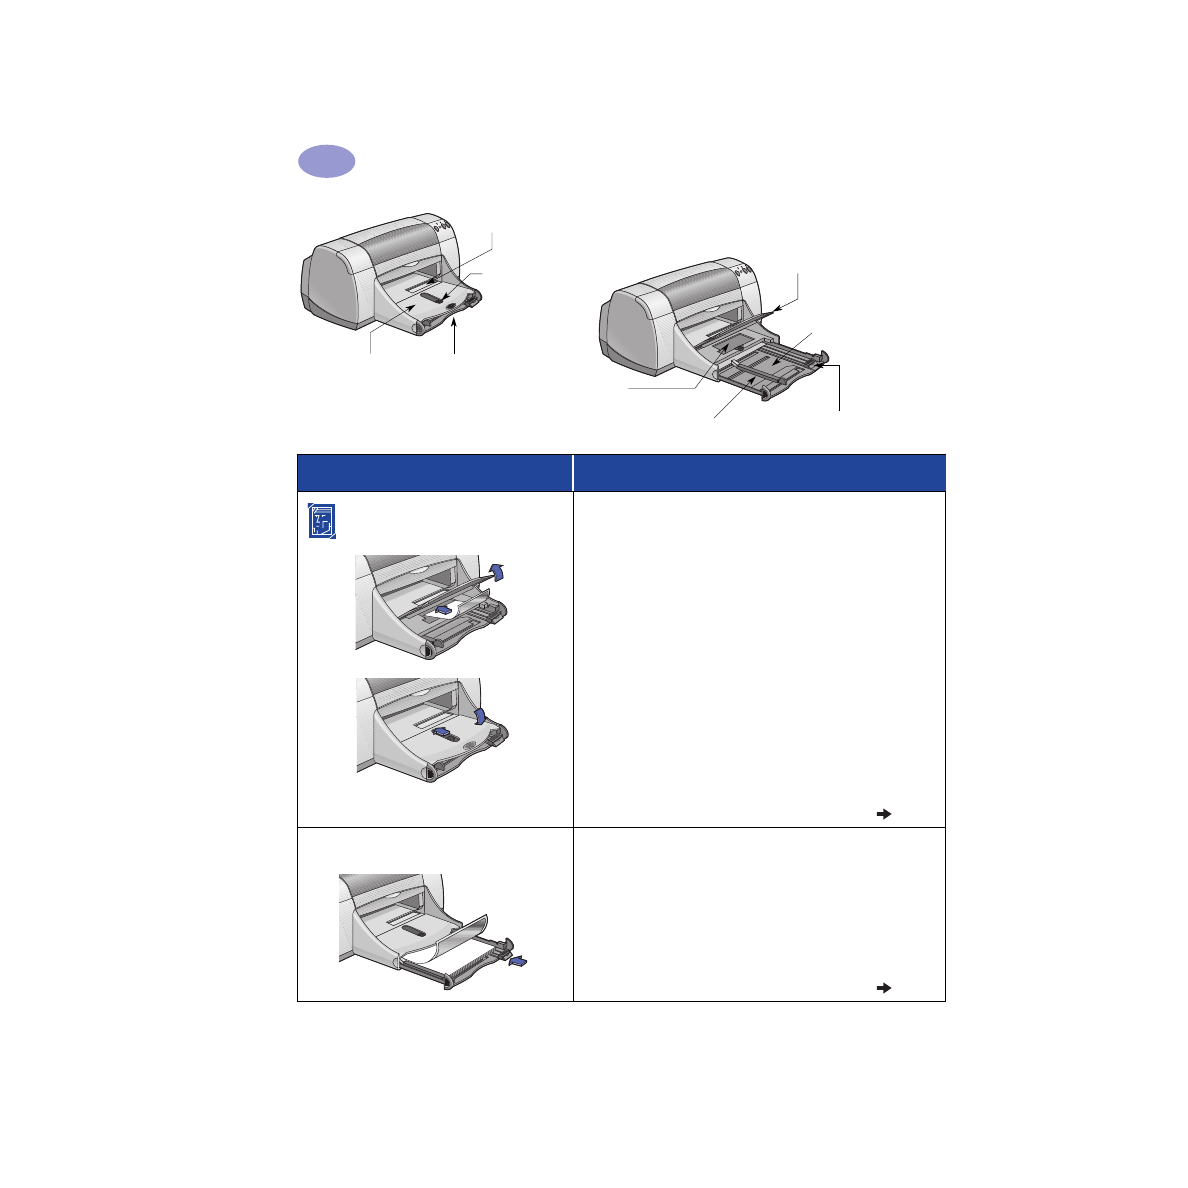
4 x 6 in., 102 x 152 mm
Photo Paper
1
Raise the OUT tray to the up position.
2
Insert up to 24 sheets of HP Premium Plus Photo
Paper, Glossy 4 x 6 in., 102 x 152 mm
(with tear-off tab) into the Photo Tray, glossy side
down. Place paper with the tear-off tab away from
the printer.
3
Lower the OUT tray.
4
Press the Photo Tray Button and slide it toward the
printer so that the Photo Tray is engaged.
5
Choose the appropriate print settings.
6
Print the photo.
Note:
The first time you use the Photo Tray, the
printer will calibrate the tray by feeding through a
blank sheet.
7
When you have finished printing, press down on the
Photo Tray Button, and slide it away from the printer
to disengage the Photo Tray.
8.5 x 11 in. or A4 Photo Paper
1
Remove all paper from the IN tray.
2
Insert up to 30 sheets of photo paper (printable side
down) into the IN tray.
3
Slide the paper guides snugly against the edges of
the paper. Make sure the IN tray is pushed in.
4
Choose the print settings that match the type and size
of the photo paper.
5
Print the photos.

11
Beyond the Basics
2
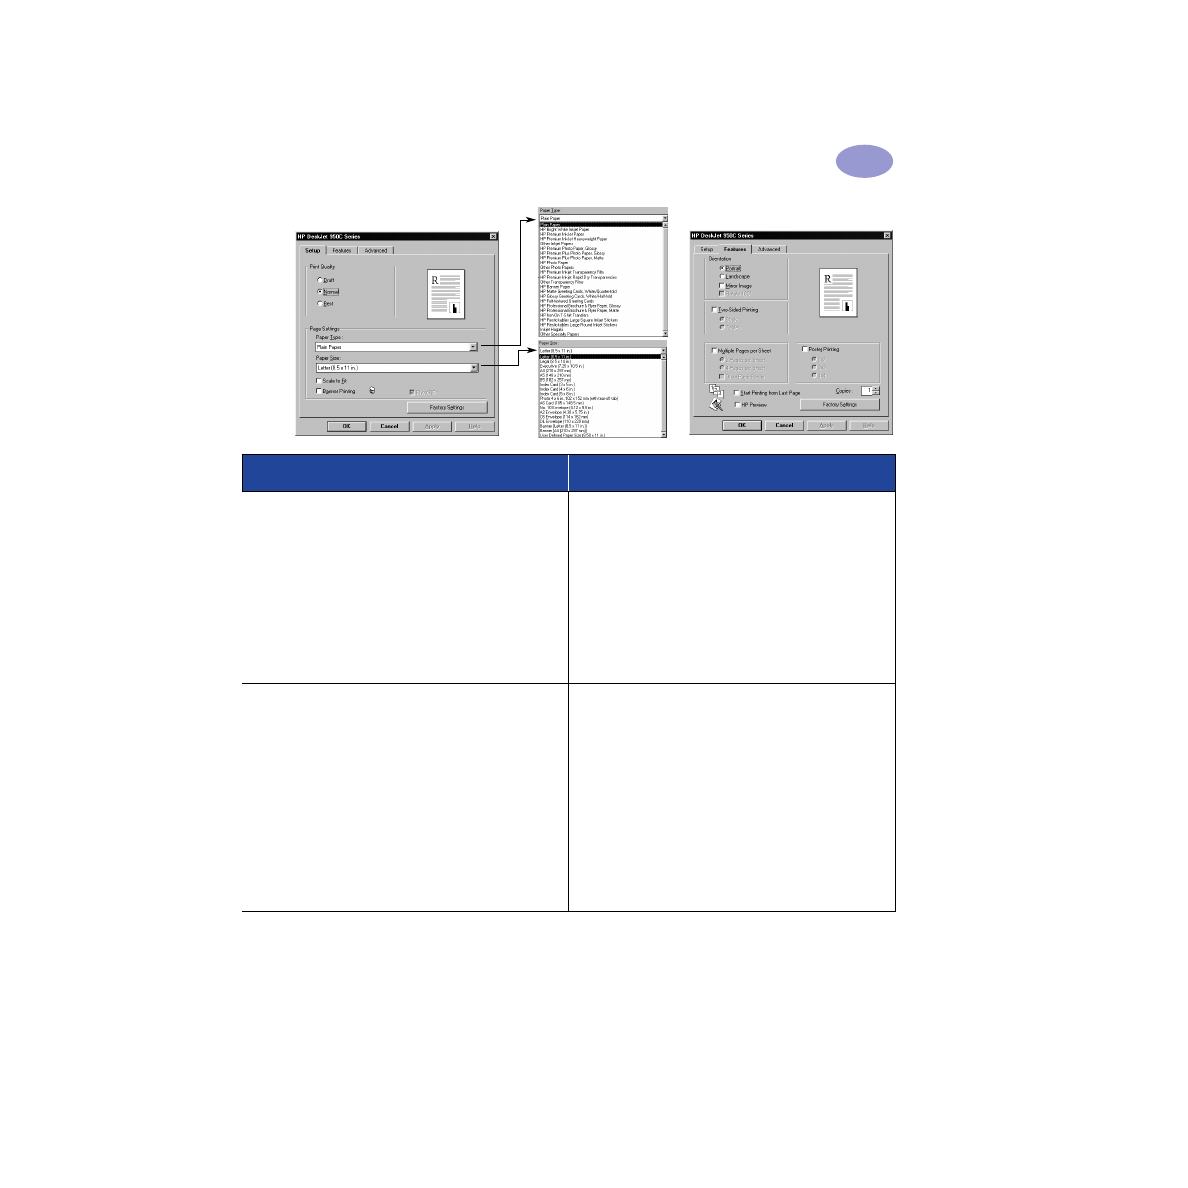
Setup Tab
Features Tab
HP print settings to choose
Guidelines to remember
Setup Tab
- Paper Type: Choose
HP Premium Plus Photo
Paper, Glossy
- Print Quality: Choose
Best
- Paper Size: Choose
Photo 4 x 6 in.,
102 x 152 mm (with tear-off tab)
Features Tab
- Orientation: Choose appropriate orientation
- Two-Sided Printing: Unchecked
• The Photo Tray is specifically designed to use HP
Premium Plus Photo Paper, Glossy 4 x 6 in.,
102 x 152 mm (with tear-off tab).
• Remember to lower the OUT tray once the photo
paper is loaded.
• Select appropriate settings on the
Setup
tab from the
pull-down menus.
• If you get an out of paper message make sure that the
Photo Tray is engaged.
• After you have finished printing, disengage the Photo
Tray by sliding the Photo Tray Button away from the
printer.
• You may be able to increase photo printing speed by
enabling Hardware ECP. Open the HP DeskJet
Toolbox. Click the
Configuration
tab and check
Attempt to Use Hardware ECP. Apply
your changes
and print your photo.
Setup Tab
- Paper Type: Choose appropriate HP Photo
Paper type
- Print Quality: Choose
Best
- Paper Size: Choose
appropriate paper size
Features Tab
- Orientation: Choose appropriate orientation
- Two-Sided Printing: Unchecked
• For best results use HP Photo Paper.
• The photo needs to be in electronic (digital) form,
before you can print it. Take a digital picture, scan a
photo, or have your local camera shop provide an
electronic file of your photo.
12
Beyond the Basics
2
OUT tray down
Paper width guide
Photo Tray
IN tray pulled out
OUT tray up
Photo Tray Button
Single envelope slot
Paper length guide
IN tray pushed in
I want to print…
I should…
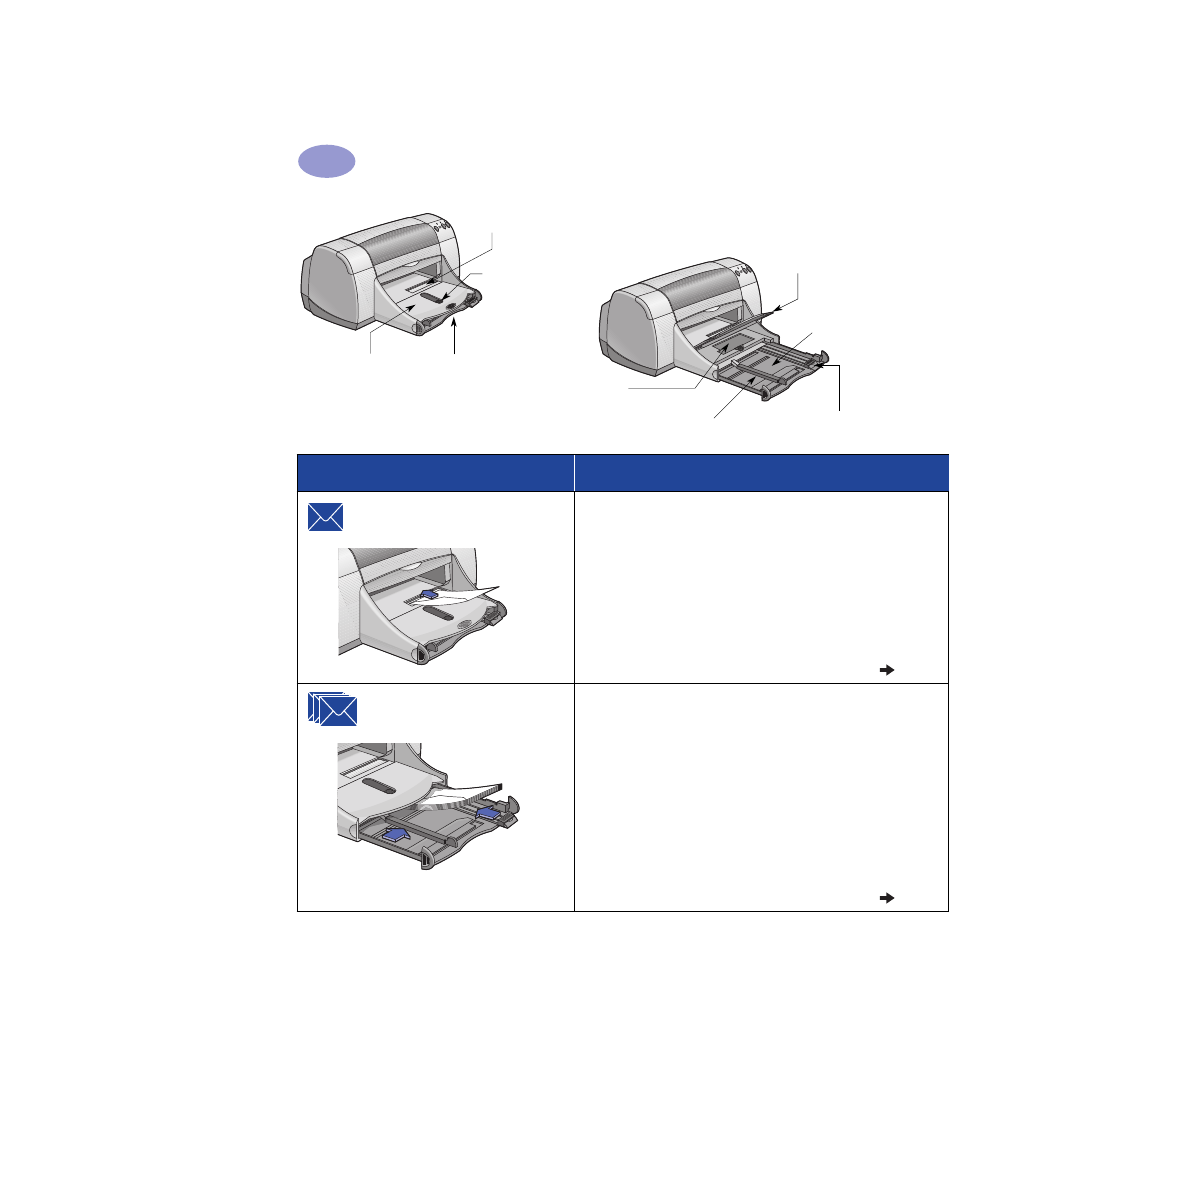
Single envelope
1
Slide the envelope, with its flap side on the left and
flap facing up, into the OUT tray’s single envelope
slot. Push the envelope in until it stops.
2
Choose the print settings that match the type
and size of the envelope.
3
Print the envelope.
Stack of envelopes
1
Slide out both of the paper guides, and remove all
paper from the IN tray.
2
Slide up to 15 envelopes, with their flap side on the
left and flap facing up, into the IN tray as far as they
will go.
3
Slide the paper guides snugly against the edges of
the envelopes.
4
Make sure the IN tray is pushed in.
5
Choose the print settings that match the type and size
of the envelopes.
6
Print the envelopes.
13
Beyond the Basics
2
Setup Tab
Features Tab
HP print settings to choose
Guidelines to remember
Setup Tab
- Paper Type: Choose
Plain Paper
- Print Quality: Choose
Normal
- Paper Size: Choose
appropriate envelope size
Features Tab
- Orientation: Choose appropriate orientation
- Two-Sided Printing: Unchecked
• Make sure the OUT tray is in the down position.
• Avoid envelopes that have clasps or windows.
• Avoid envelopes that are shiny or embossed,
envelopes with thick, irregular, or curled edges, or
envelopes that are wrinkled, torn, or otherwise
damaged.
• If your software program includes an envelope-
printing feature, follow those instructions instead of
the procedure here.
Setup Tab
- Paper Type: Choose
Plain Paper
- Print Quality: Choose
Normal
- Paper Size: Choose appropriate envelope size
Features Tab
- Orientation: Choose appropriate orientation
- Two-Sided Printing: Unchecked
•
Never
load more than 15 envelopes at one time.
• Align the envelope edges before inserting them.
• Avoid envelopes that have clasps or windows.
• Avoid envelopes that are shiny or embossed,
envelopes with thick, irregular, or curled edges, or
envelopes that are wrinkled, torn, or otherwise
damaged.
• If your software program includes an envelope-
printing feature, follow those instructions instead of
the procedure here.
14
Beyond the Basics
2
OUT tray down
Paper width guide
Photo Tray
IN tray pulled out
OUT tray up
Photo Tray Button
Single envelope slot
Paper length guide
IN tray pushed in
I want to print…
I should…
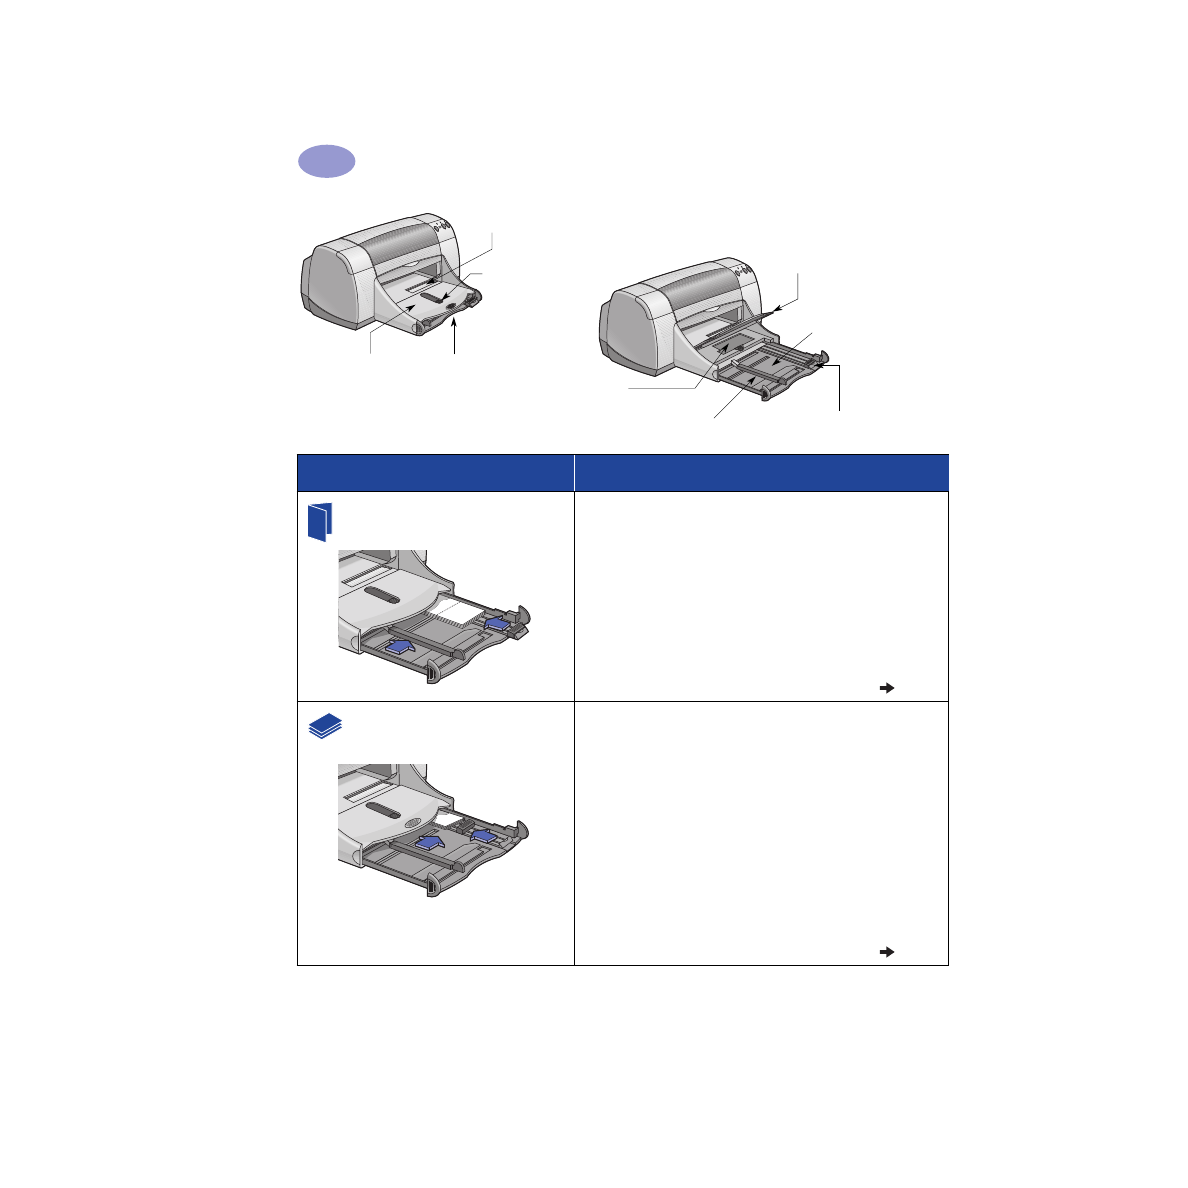
Greeting Cards
1
Slide out both of the paper guides, and remove all
paper from the IN tray.
2
Insert up to 5 cards into the IN tray as far as they will
go.
3
Slide the paper guides snugly against the edges of
the cards.
4
Make sure the IN tray is pushed in.
5
Choose the print settings that match the type and size
of the cards.
6
Print the cards.
Cards (index, business, and
other small media)
1
Pull out the IN tray.
2
Slide out both of the paper guides, and remove all
paper from the IN tray.
3
Insert up to 30 cards into the IN tray as far as they
will go.
4
Push the paper length guide in as far as it will go.
Push the fine-length guide (colored portion of paper
length guide) snugly against the small media. Then
push the paper width guide in.
5
Make sure the IN tray is pushed in.
6
Choose the print settings that match the type and size
of the cards.
7
Print the cards.

15
Beyond the Basics
2
Setup Tab
Features Tab
HP print settings to choose
Guidelines to remember
Setup Tab
- Paper Type: Choose appropriate HP Greeting
Card type
- Print Quality: Choose
Normal
or
Best
- Paper Size: Choose
appropriate card size
Features Tab
- Orientation: Choose appropriate orientation
• For best results use HP Greeting Card Paper.
• If you have pre-folded greeting cards, unfold the
cards, then load the cards into the IN tray.
• Align the card edges before inserting the cards.
• For ease of loading small cards, pull out the IN tray
and raise the OUT tray. After you have inserted the
cards, push the IN tray in and lower the OUT tray.
Setup Tab
- Paper Type: Choose
Plain Paper
- Print Quality: Choose
Normal
- Paper Size: Choose appropriate card size
Features Tab
- Orientation: Choose appropriate orientation
- Two-Sided Printing: Unchecked
• Align the edges of the media before inserting it.
• For ease of loading small cards, pull out the IN tray
and raise the OUT tray.
• After you have inserted the cards, make sure the fine-
length adjuster fits snugly against the small media.
Then push the IN tray in and lower the OUT tray.
16
Beyond the Basics
2
OUT tray down
Paper width guide
Photo Tray
IN tray pulled out
OUT tray up
Photo Tray Button
Single envelope slot
Paper length guide
IN tray pushed in
I want to print…
I should…
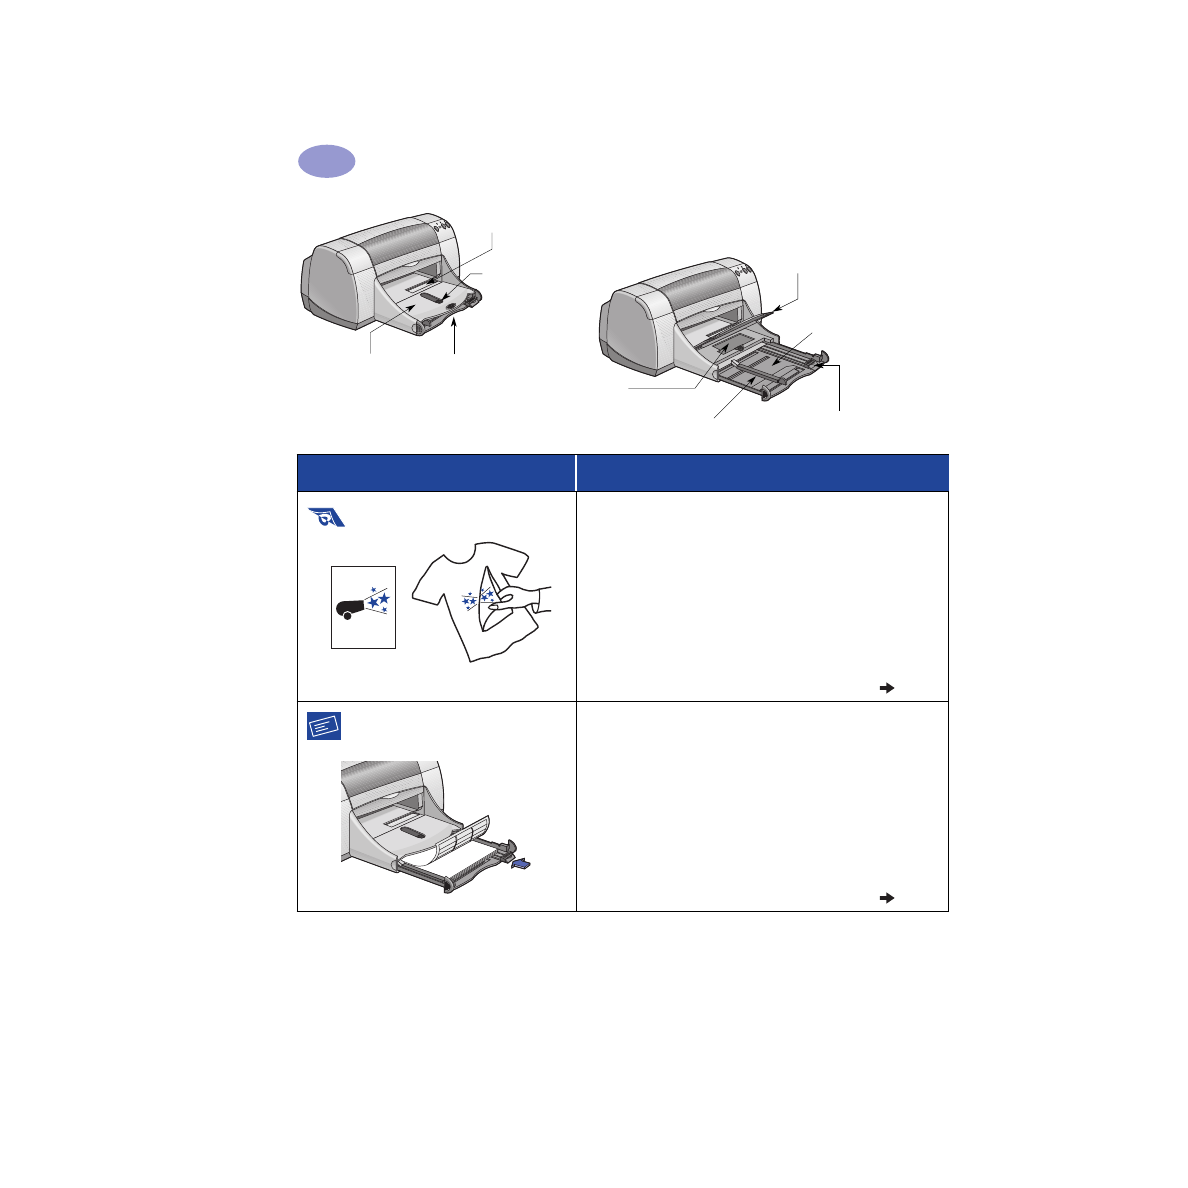
Iron-on Transfers
1
Slide out both of the paper guides, and remove all
paper from the IN tray.
2
Load the transfer paper transparent (or glossy)
side down.
3
Slide the paper guides snugly against the sheets.
4
Make sure the IN tray is pushed in.
5
Choose the print settings that match the type and size
of your iron-on transfers.
6
Print your transfer.
Labels
1
Slide out both of the paper guides, and remove all
paper from the IN tray.
2
Fan the edges of the label sheets to separate them,
then align the label edges. Insert up to 20 label
sheets (label side down).
3
Slide the paper guides snugly against the sheets.
4
Make sure the IN tray is pushed in.
5
Choose the print settings that match the type and size
of labels.
6
Print the labels.

17
Beyond the Basics
2
Setup Tab
Features Tab
HP print settings to choose
Guidelines to remember
Setup Tab
- Paper Type: Choose
HP Iron-On T-Shirt
Transfers
- Print Quality: Choose
Normal
or
Best
- Paper Size: Choose
appropriate size
Features Tab
- Orientation: Choose
Mirror Image
- Two-Sided Printing: Unchecked
• When you print a mirror-imaged document, the text
and pictures are flipped horizontally from what you
see on your computer screen.
• For best results, use HP Iron-On T-Shirt Transfers.
Setup Tab
- Paper Type: Choose
Plain Paper
- Print Quality: Choose
Normal
- Paper Size: Choose
A4
or
Letter (8.5x11 in.)
Features Tab
- Orientation: Choose appropriate orientation
- Two-Sided Printing: Unchecked
• Use only paper labels that are designed specifically
for use with inkjet printers.
• Never load more than 20 sheets at one time.
• Use only full sheets of labels.
• Make sure the sheets are not sticky, wrinkled, or
pulling away from their protective backing.
•
Do not
use plastic or clear labels. The ink will not dry
when used with plastic or clear labels.
18
Beyond the Basics
2
OUT tray down
Paper width guide
Photo Tray
IN tray pulled out
OUT tray up
Photo Tray Button
Single envelope slot
Paper length guide
IN tray pushed in
I want to print…
I should…
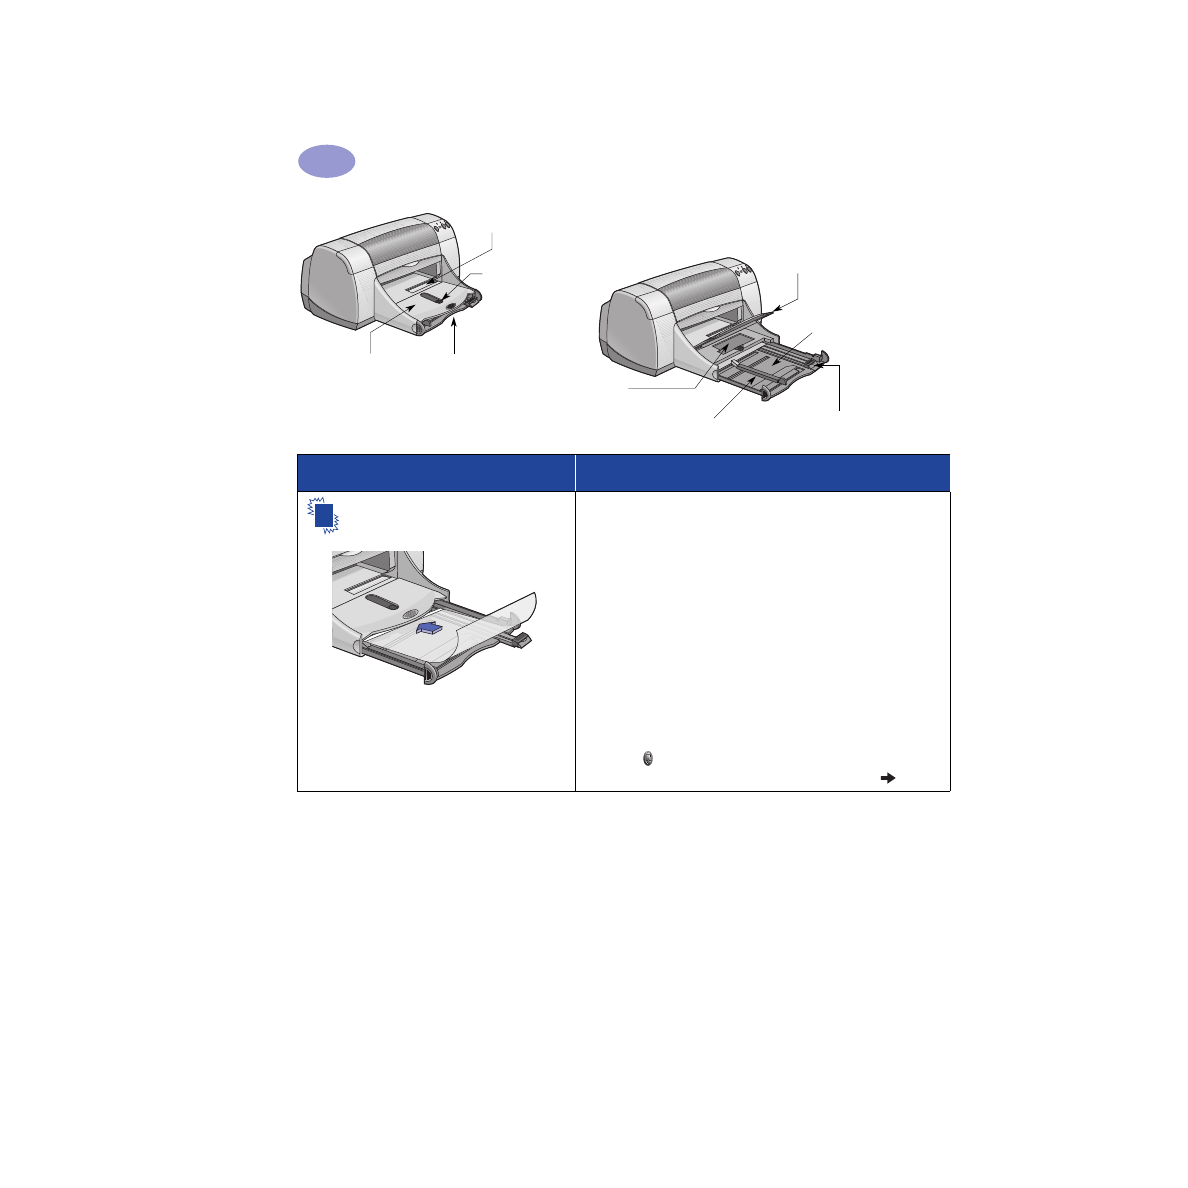
Transparencies
1
Slide out both of the paper guides, and remove all
paper from the IN tray.
2
Fan the edges of the transparency sheets to
separate them, then align the edges.
3
Insert a stack of up to 25 transparency sheets, rough
side down and the adhesive strip towards the printer.
4
Slide the paper guides snugly against the
transparencies.
5
Make sure the IN tray is pushed in.
6
Choose the print settings that match the type and size
of the transparencies.
7
Print the transparencies.
8
The printer waits for transparencies to dry before
releasing them automatically. Press the
Resume
Button
to continue printing.

19
Beyond the Basics
2
Setup Tab
Features Tab
HP print settings to choose
Guidelines to remember
Setup Tab
- Paper Type: Choose transparency type
- Print Quality: Choose
Best
or
Normal
- Paper Size: Choose
appropriate size
Features Tab
- Orientation: Choose appropriate orientation
- Two-Sided Printing: Unchecked
• For best results, use HP Premium Inkjet Transparency
Film or HP Premium Inkjet Rapid-dry Transparencies.
The film coating on HP Premium Inkjet Rapid-Dry
Transparencies is especially developed to work with
HP inks, giving you crisp images and text and the
fastest drying times. In addition, they won’t jam your
printer.
20
Beyond the Basics
2
OUT tray down
Paper width guide
Photo Tray
IN tray pulled out
OUT tray up
Photo Tray Button
Single envelope slot
Paper length guide
IN tray pushed in
I want to print…
I should…
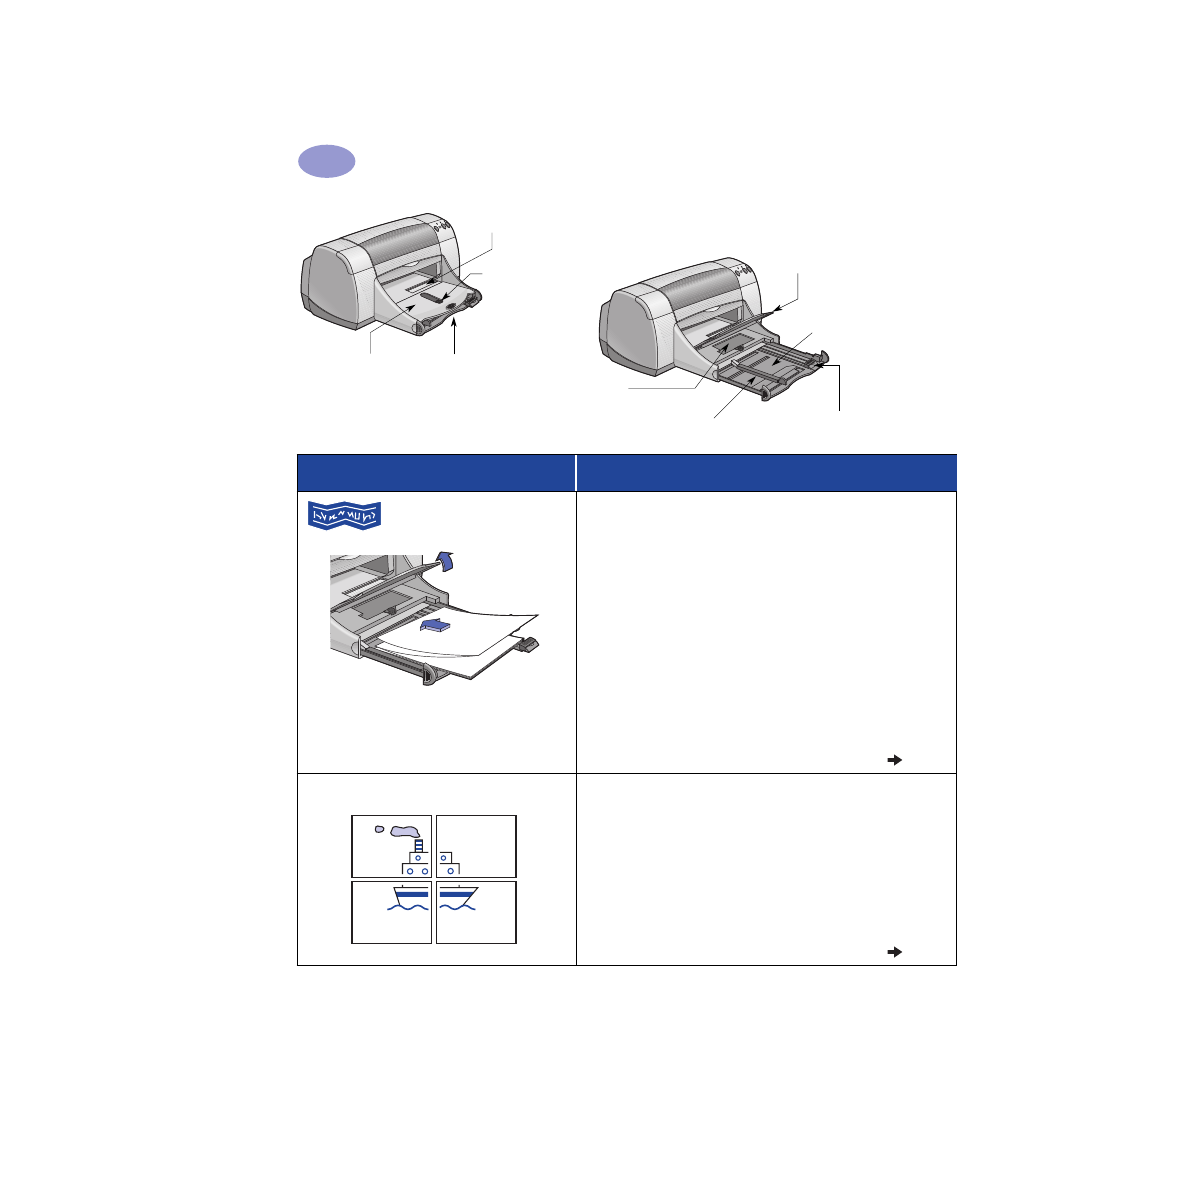
Banners
1
Tear off the number of sheets (up to 20) you need.
2
Tear off and discard the perforated strips, if any.
3
Slide out the paper guides, and remove all paper from
the IN tray.
4
Raise the OUT tray and leave it in the up position to
print your banners.
5
Put the banner paper in the IN tray so that the
unattached edge of the banner paper stack is toward
the printer.
6
Slide the paper guides snugly against the sheets.
7
Make sure the IN tray is pushed in.
8
Check
Banner Printing
in the
Setup
tab and choose
the appropriate paper type and size.
9
Print the banner.
Posters
1
Load paper in the IN tray.
2
Slide the paper guides snugly against the sheets.
3
Make sure the IN tray is pushed in.
4
Choose the print settings that match the type and size
of your poster.
5
Print your poster.

21
Beyond the Basics
2
Setup Tab
Features Tab
HP print settings to choose
Guidelines to remember
Setup Tab
- Banner Printing: Check this box
- Paper Type: Choose
HP Banner Paper
or
Plain Paper
- Print Quality: Choose
Normal
- Paper Size: Choose
A4
or
Letter (8.5x11 in.)
Features Tab
- Orientation: Choose appropriate orientation
- Two-Sided Printing: Unchecked
• When printing banners, be sure that the OUT tray is
placed in the up position and the IN tray is pushed in.
• For best results, use HP Banner Paper.
• If you are having problems printing a banner, see
“Banners aren’t printing correctly.” on page 43 in the
Troubleshooting Tips.
Setup Tab
- Paper Type: Choose
Plain Paper
- Print Quality: Choose
Normal
- Paper Size: Choose appropriate size
Features Tab
- Orientation: Choose appropriate orientation
- Two-Sided Printing: Unchecked
- Poster Printing: Check this box and choose size
2x2
,
3x3
, or
4x4
• After printing, trim the edges on each sheet and tape
the sheets together.
22
Beyond the Basics
2
OUT tray down
Paper width guide
Photo Tray
IN tray pulled out
OUT tray up
Photo Tray Button
Single envelope slot
Paper length guide
IN tray pushed in
I want to print…
I should…
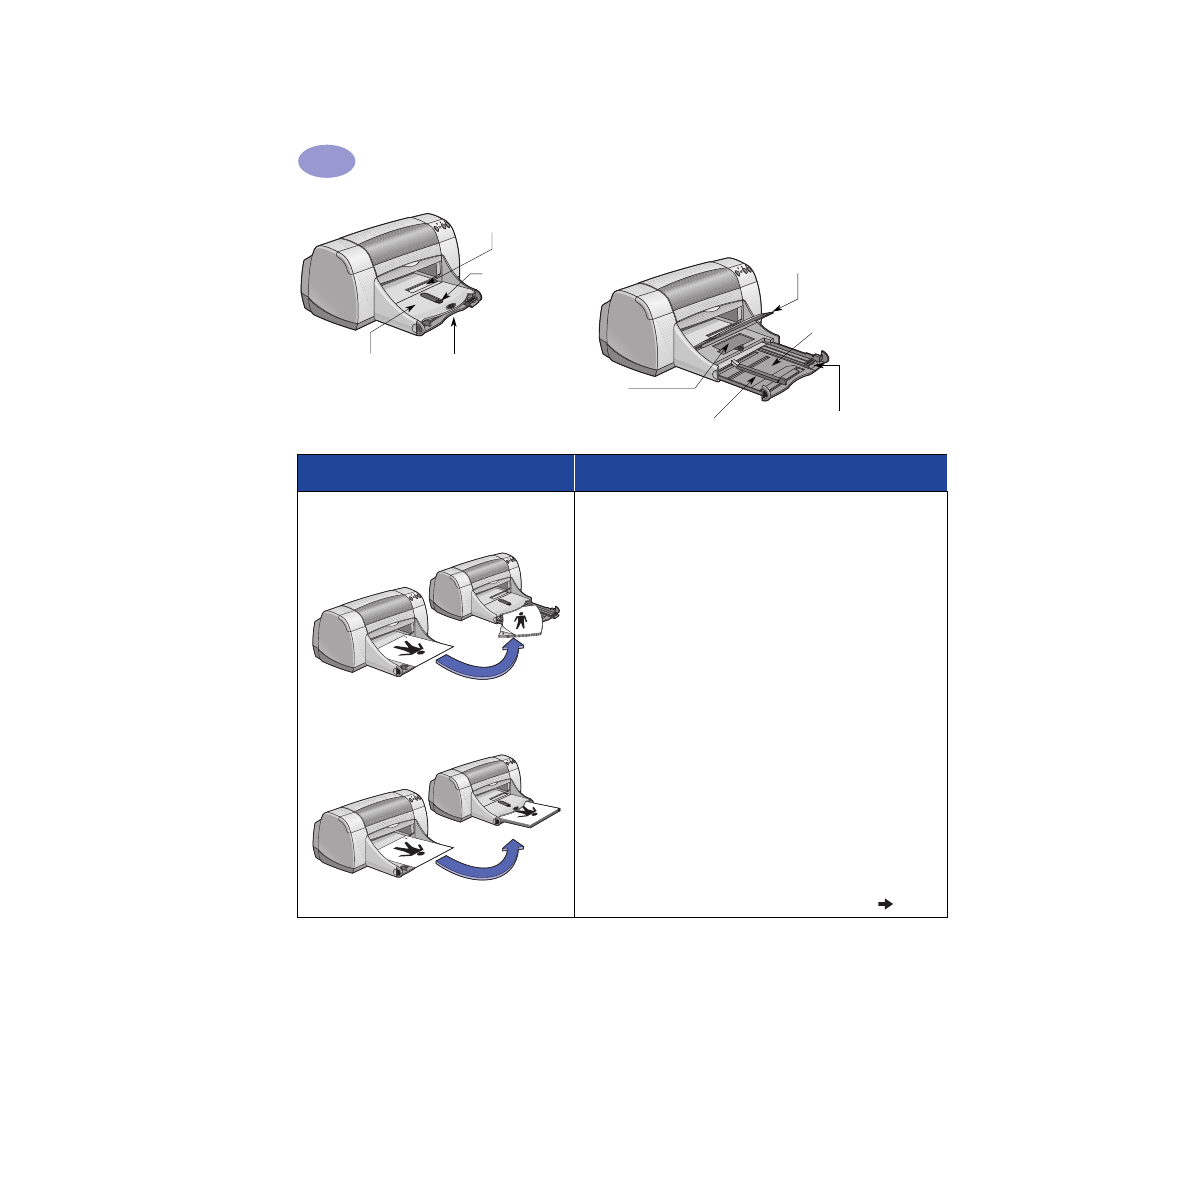
Manual Two-Sided Printing
Book Binding
Tablet Binding
1
Load paper into the IN tray. Make sure there’s no
paper in the OUT tray.
2
Slide the paper guides snugly against the sheets.
3
Make sure the IN tray is pushed in.
4
Choose the print settings that match the type and size
of your paper.
5
In the
Features
tab, click
Two-Sided Printing
, then
select
Book
or
Tablet
.
6
Begin printing.
7
Carefully follow the reloading instructions
displayed on your computer screen.
8
When the paper is properly reloaded, click
Continue
in the message box on your computer
screen.

23
Beyond the Basics
2
Setup Tab
Features Tab
HP print settings to choose
Guidelines to remember
Setup Tab
- Paper Type: Choose appropriate type
- Print Quality: Choose
Normal
- Paper Size: Choose
appropriate size
Features Tab
- Orientation: Choose appropriate orientation
- Two-Sided Printing: Check this box, then choose
Book
(for binding on the side) or
Tablet
(for
binding at the top).
• The printer prints one side of the paper first. Then, a
message on your computer screen tells you how to
reload the paper and resume printing. The reverse
side of the paper is then printed.
• If you want to do two-sided printing automatically,
you can purchase a Two-Sided Printing Module. This
accessory may not be available in all countries (see
“Supplies and Accessories” on page A- 6 for ordering
information).

24
Beyond the Basics
2
NOTES
25
3